Docker与MongoDB实践二:性能和容错
发布日期:2016-4-18 21:4:38
Docker与MongoDB实践二:性能和容错 之前我们已经知道怎样创建与运行一个简单的基于CentOS的MongoDB实例。这对于开发或者测试使用来说再好不过,可是它并没有说明一些性能与容错能力的问题。本文从说明了Docker相关的磁盘存储选项,以及在其之上运行数据库的注意事项。 一、文件系统分层 如图1所示: Docker最重要的特性就是分层文件系统。每个基础层都是只读的,这些基础层通过相互叠加构成真实的文件系统,最上面的层是读写层(可读可写)。它们不仅非常便于版本管理,同时也可以缓存(我们不需要每次都从头开始构建)。 与传统的镜像方式对比,这真是一个巨大的改变,之前的整个文件系统镜像或者虚拟机模板都是手工构建的,根本不知道其中包含了什么以及为什么要包含。最近我们注意到有很多的配置管理工具,比如Puppet、mssql、 Chef与Ansible,但从头开始构建一个复杂且灵活的镜像非常耗时间。Docker分层的方式可以加快构建时间,由于它只需要重构仅仅做出修改的文件层。 但这种方式并不是没有缺点:
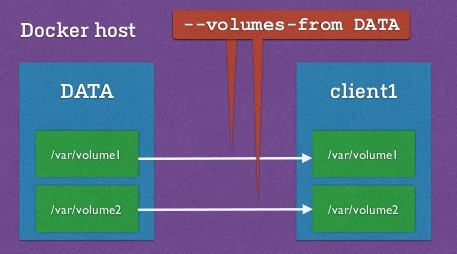
这里有两个主要的数据卷类型:主机目录与仅存储数据的容器。 1.数据卷:主机目录 如图2所示: 一个主机目录数据卷是一个被挂载在原始容器的简单的目录。就像我们在第一部分中介绍的:在Docker主机中创建一个目录,然后使用它作为MongoDB的dbpath(容纳数据和分类文件)。比如以下代码: $ docker run -d -P -v ~/db:/data/db mongod --smallfiles 通过检查日志文件来确认MongoDB容器是否启动成功,如以下代码所示: $ docker ps CONTAINER ID IMAGE COMMAND CREATED STATUS PORTS NAMES efca3b637a75 mongod:latest "mongod --smallfiles 9 minutes ago Up 9 minutes 0.0.0.0:49160->27017/tcp prickly_sammet $ docker logs efca3b637a75 2015-02-01T18:35:02.279+0000 [initandlisten] MongoDB starting : pid=1 port=27017 dbpath=/data/db 64-bit host=efca3b637a75 2015-02-01T18:35:02.279+0000 [initandlisten] db version v2.6.7 2015-02-01T18:35:02.279+0000 [initandlisten] git version: a7d57ad27c382de82e9cb93bf983a80fd9ac9899 2015-02-01T18:35:02.279+0000 [initandlisten] build info: Linux build7.nj1.10gen.cc 2.6.32-431.3.1.el6.x86_64 #1 SMP Fri Jan 3 21:39:27 UTC 2014 x86_64 BOOST_LIB_VERSION=1_49 2015-02-01T18:35:02.279+0000 [initandlisten] allocator: tcmalloc 2015-02-01T18:35:02.279+0000 [initandlisten] options: { storage: { smallFiles: true } } 2015-02-01T18:35:02.282+0000 [initandlisten] journal dir=/data/db/journal 2015-02-01T18:35:02.283+0000 [initandlisten] recover : no journal files present, no recovery needed 2015-02-01T18:35:02.454+0000 [initandlisten] allocating new ns file /data/db/local.ns, filling with zeroes... 2015-02-01T18:35:02.510+0000 [FileAllocator] allocating new datafile /data/db/local.0, filling with zeroes... 2015-02-01T18:35:02.510+0000 [FileAllocator] creating directory /data/db/_tmp 2015-02-01T18:35:02.513+0000 [FileAllocator] done allocating datafile /data/db/local.0, size: 16MB, took 0.001 secs 2015-02-01T18:35:02.514+0000 [initandlisten] build index on: local.startup_log properties: { v: 1, key: { _id: 1 }, name: "_id_", ns: "local.startup_log" } 2015-02-01T18:35:02.514+0000 [initandlisten] added index to empty collection 2015-02-01T18:35:02.514+0000 [initandlisten] waiting for connections on port 27017 2015-02-01T18:36:02.481+0000 [clientcursormon] mem (MB) res:36 virt:246 2015-02-01T18:36:02.481+0000 [clientcursormon] mapped (incl journal view):64 2015-02-01T18:36:02.481+0000 [clientcursormon] connections:0 2015-02-01T18:41:02.571+0000 [clientcursormon] mem (MB) res:36 virt:246 2015-02-01T18:41:02.571+0000 [clientcursormon] mapped (incl journal view):64 2015-02-01T18:41:02.571+0000 [clientcursormon] connections:0 确保数据文件已经在指定的主机目录~/db中创建。 $ ls -l ~/db total 32776 drwxr-xr-x. 2 root root 17 Feb 1 18:35 journal -rw-------. 1 root root 16777216 Feb 1 18:35 local.0 -rw-------. 1 root root 16777216 Feb 1 18:35 local.ns -rwxr-xr-x. 1 root root 2 Feb 1 18:35 mongod.lock drwxr-xr-x. 2 root root 6 Feb 1 18:35 _tmp (1)快速衡量(Quick benchmarking) 主机目录数据卷比默认的分层文件系统快了多少?这当然依赖于你的环境,当然,本文也不会过多介绍性能测试的东西。但这里有一个快速的方法就是使用mongoperf来测试。如以下代码所示: # mongoperf process on latest CentOS # See https://docs.docker.com/articles/dockerfile_best-practices/ FROM centos MAINTAINER James Tan COPY mongodb.repo/etc/yum.repos.d/ RUN yum install-ymongodb-org-tools WORKDIR/tmp ENTRYPOINT["mongoperf"] 这里我们使用与第一部分中案例相同的mongodb.repo,为了方便这里我们再做一次,如以下代码所示: [mongodb] name=MongoDB Repository baseurl=http://downloads-distro.mongodb.org/repo/redhat/os/x86_64/ gpgcheck=0 enabled=1 使用在你当前的目录如上的两个文件,构建将要运行的镜像,如以下代码: $ docker build -t mongoperf . 现在衡量分层的根目录文件系统,通过运行以下代码: $ echo "{nThreads:32,fileSizeMB:1000,r:true,w:true}" | docker run -i --sig-proxy=false mongoperf 你应该看到相似的输出如下所示: mongoperf use -h for help parsed options: { nThreads: 32, fileSizeMB: 1000, r: true, w: true } creating test file size:1000MB ... testing... optoins:{ nThreads: 32, fileSizeMB: 1000, r: true, w: true } wthr 32 new thread, total running : 1 read:1 write:1 877 ops/sec 3 MB/sec 928 ops/sec 3 MB/sec 920 ops/sec 3 MB/sec ... new thread, total running : 2 read:1 write:1 1211 ops/sec 4 MB/sec 1158 ops/sec 4 MB/sec 1172 ops/sec 4 MB/sec ... new thread, total running : 4 read:1 write:1 read:1 write:1 1194 ops/sec 4 MB/sec 1163 ops/sec 4 MB/sec 1162 ops/sec 4 MB/sec ... new thread, total running : 8 read:1 write:1 ... 1112 ops/sec 4 MB/sec 1161 ops/sec 4 MB/sec 1174 ops/sec 4 MB/sec ... new thread, total running : 16 read:1 write:1 ... 1156 ops/sec 4 MB/sec 1178 ops/sec 4 MB/sec 1160 ops/sec 4 MB/sec ... new thread, total running : 32 read:1 write:1 ... 1244 ops/sec 4 MB/sec 1205 ops/sec 4 MB/sec 1211 ops/sec 4 MB/sec ... mongoperf将一直运行,你可以通过Ctrl+C退出终端。容器将一直运行在后台,因此让我们结束它。 $ docker ps CONTAINER ID IMAGE COMMAND CREATED STATUS PORTS NAMES c1366d08b543 mongoperf:latest "mongoperf" 4 minutes ago Up 3 minutes boring_kirch $ docker rm -f c1366d08b543 c1366d08b543 现在再运行下主机目录数据卷,代码如下所示: $ mkdir ~/tmp $ echo "{nThreads:32,fileSizeMB:1000,r:true,w:true}" | docker run -i --sig-proxy=false -v ~/tmp:/tmp mongoperf 从我们设置开始,这就有相同的输出,如下所示: mongoperf use -h for help parsed options: { nThreads: 32, fileSizeMB: 1000, r: true, w: true } creating test file size:1000MB ... testing... optoins:{ nThreads: 32, fileSizeMB: 1000, r: true, w: true } wthr 32 new thread, total running : 1 read:1 write:1 1273 ops/sec 4 MB/sec 1242 ops/sec 4 MB/sec 1178 ops/sec 4 MB/sec ... new thread, total running : 2 read:1 write:1 2437 ops/sec 9 MB/sec 2702 ops/sec 10 MB/sec 2546 ops/sec 9 MB/sec ... new thread, total running : 4 read:1 write:1 read:1 write:1 2575 ops/sec 10 MB/sec 2465 ops/sec 9 MB/sec 2558 ops/sec 9 MB/sec ... new thread, total running : 8 read:1 write:1 ... 2471 ops/sec 9 MB/sec 3081 ops/sec 12 MB/sec 3027 ops/sec 11 MB/sec ... new thread, total running : 16 read:1 write:1 ... 3031 ops/sec 11 MB/sec 3376 ops/sec 13 MB/sec 3384 ops/sec 13 MB/sec ... new thread, total running : 32 read:1 write:1 ... 3272 ops/sec 12 MB/sec 3196 ops/sec 12 MB/sec 3385 ops/sec 13 MB/sec ... 停止并移除之前的容器。 具有32个并行读写线程结果最后一组比较,我们看到在操作每秒数量提高180%,从1211到3385 ops/s。还有的吞吐量增加了225%,从4到13 MB/s。 (2)容器可移植性 虽然以上所示的方式中性能得到了提升,但是这并不利于容器的迁移,因为现在我们的Docker容器需要依赖外部的Docker主机上的目录,而这个目录却没有通过Docker来管理,所以我们不能简单的运行或者迁移它。最好的解决方案就是使用data-only容器,接下来,我们将详述。 2.数据卷:仅有数据的容器 如图3所示  仅有数据(data-only)的容器是推荐的Docker数据存储模式,它可以解耦对主机的依赖。 为了创建数据容器来作为衡量标准,我们重新使用已经存在的mongoperf镜像,如以下代码: $ docker create -v /tmp --name mongoperf-data mongoperf 7d476bb9d3ca0cf282e2d3b9cf54e18d7bbe9b561be5d34646947032b64b4b9c 使用数据容器,重新运行测试标准,使用--volume-from mongoperf-data参数。 $ echo "{nThreads:32,fileSizeMB:1000,r:true,w:true}" | docker run -i --sig-proxy=false --volumes-from mongoperf-data mongoperf 这个过程如下面的输出,如下所示: mongoperf use -h for help parsed options: { nThreads: 32, fileSizeMB: 1000, r: true, w: true } creating test file size:1000MB ... testing... optoins:{ nThreads: 32, fileSizeMB: 1000, r: true, w: true } wthr 32 new thread, total running : 1 read:1 write:1 1153 ops/sec 4 MB/sec 1146 ops/sec 4 MB/sec 1151 ops/sec 4 MB/sec ... new thread, total running : 2 read:1 write:1 1857 ops/sec 7 MB/sec 2489 ops/sec 9 MB/sec 2459 ops/sec 9 MB/sec ... new thread, total running : 4 read:1 write:1 read:1 write:1 2518 ops/sec 9 MB/sec 2477 ops/sec 9 MB/sec 2451 ops/sec 9 MB/sec ... new thread, total running : 8 read:1 write:1 ... 2812 ops/sec 10 MB/sec 2837 ops/sec 11 MB/sec 2793 ops/sec 10 MB/sec ... ew thread, total running : 16 read:1 write:1 ... 3111 ops/sec 12 MB/sec 3319 ops/sec 12 MB/sec 3263 ops/sec 12 MB/sec ... new thread, total running : 32 read:1 write:1 ... 2919 ops/sec 11 MB/sec 3274 ops/sec 12 MB/sec 3306 ops/sec 12 MB/sec ... 性能方面它和主机目录数据卷方式一致。即使引用容器被移除了,仅仅包含数据的容器依然存在。我们继续运行查看,如下所示: $ docker ps -a CONTAINER ID IMAGE COMMAND CREATED STATUS PORTS NAMES 7d476bb9d3ca mongoperf:latest "mongoperf" 9 minutes ago mongoperf-data 二、结束 回顾一下我们的mongod容器,我们现在使用data-only容器来存储数据以获得更好的性能,如以下代码。 $ docker create -v /data/db --name mongod-data mongod $ docker run -d -P --volumes-from mongod-data mongod --smallfiles 记住,你可以通过运行docker ps看到映射的本地端口值。例如以下代码: $ docker ps CONTAINER ID IMAGE COMMAND CREATED STATUS PORTS NAMES 08245e631171 mongod:latest "mongod --smallfiles 40 seconds ago Up 39 seconds 0.0.0.0:49165->27017/tcp gloomy_meitner $ mongo --port 49165 MongoDB shell version: 2.6.7 connecting to: 127.0.0.1:49165/test > 数据卷将最终成为Docker里的头等公民。同时,考虑使用社区工具,像docker-volume来更加轻松的管理他们。 三、接下来 在接下来的部分,我们将研究各种各样的Docker网络参数,并细说哪种更适合多主机的MongoDB副本集,还有一些mssql的知识。敬请期待! 原文链接:MONGODB & DOCKER – PART 2
|